Are those colors real? Basics of Astrophotographs
Ever since I‘ve been doing astrophotography, I’ve slowly gotten over my insecurities of showing my work to family and friends, mostly online. When I first got started, I was often troubled how my pictures seemed so drab compared to the ones I‘d see online by other amateurs, not even taking into account the work of professionals. Even though I have a long way to go, I am glad that my pictures are starting to look a bit better.
Recently, I posted a photo of Messier 66 and 65 (below) that I had taken and posted it on Facebook. I asked friends to vote on their favorite Messier.
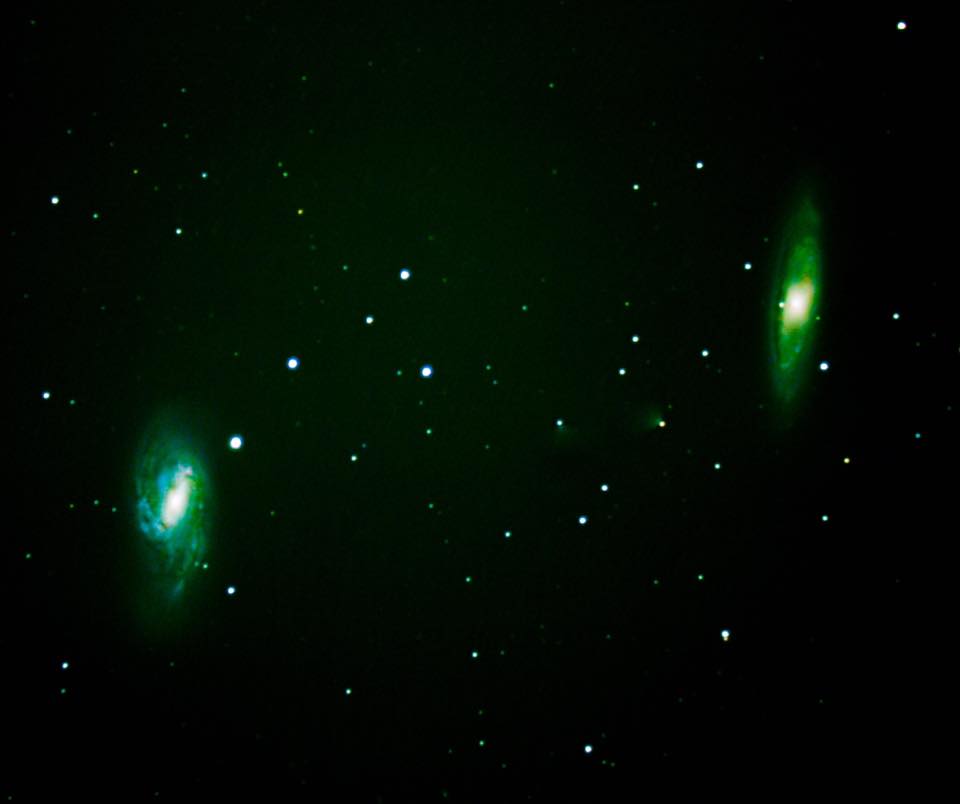
The majority picked Messier 66, mostly, I think, because it is more colorful. (Though philosophically, M65 is much more symmetrical and beautiful in its own way, wouldn’t you say?)
This all led to one of my FB friends asking, “Is my understanding correct that the color is artificially added after?”
Great question! But how to answer?
The quick answer is, Yes, almost every image you see online has been digitally processed in some way.
At the same time, The answer is no, color is not added. That is, it’s technically not correct to say that color is added, because in reality, all post-processing of astronomical images start with color information that is already embedded in the light data captured by the digital camera.
So in answer to the question, Is color artificially added after? is: It can be, but in most cases, astrophotographers are only seeking to bring out the color that is already there.
But that doesn’t really clarify much, does it? So what’s going on with the colors we see in these images? Are they real or just an outworking of artistic license and interpretation?
There’s no need to deny that at some level, all post-processing of images involves a degree of subjectivity or personal preference. This is no different than how digital prints or even film prints might look different depending on which vendor you choose to have your pictures developed. And of course, we’ve all taken a sunset picture, or pictures of a colourful object like a flower, only to be disappointed when we get the photo developed or look at it on our screen. It’s not quite the way we experienced it in real life.
It is undeniable that some photos we might see online of nebulae, galaxies or planets or even the moon have been digitally altered. What you see is almost certainly not actually the color of the object. With today’s image processing software (like Photoshop and Gimp, to name just a couple of the better known apps), it is easy to mess with the so-called “natural colors” that astronomical objects emits. So at least in some cases, Yes, colors are altered from the “original.”
But notice that I said “altered” not “added.” In certain respects, it takes significant expertise to “add” color to complex objects such as a nebula or galaxy, precisely because there are so many different shades of color happening all at once. So very, very technically, you can’t “add” color to what is already there. You can only take the colors that are there and alter them by increasing their brightness, contrast, luminance, shading, intensity, saturation, and whole bunch of other terms that image processing software uses.
Let me show you the above image as it was first processed. This is a combination of 26, three minute exposures all “stacked” on top of each other to produce the following:
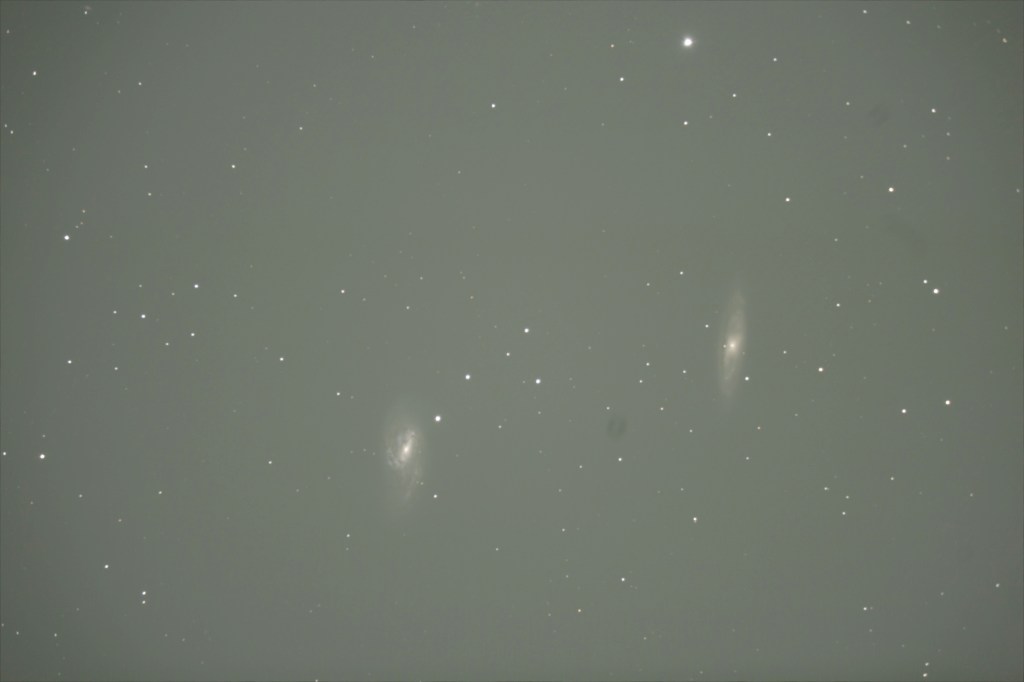
Here’s a few things to notice:
- Notice the size of the main objects, M66 and M65, in this picture. This is how big they actually show up in the frame finder of my camera (i.e., not cropped). However, the fact is, if you looked through the viewfinder, you’d struggle mightily to see anything, let alone color, because the objects are so faint. Don’t forget: These two objects are over 35 million light years away. Remember, what you see above is the equivalent of over an hour of exposure time!
- The background color is far from the “black” sky that we might expect to see. That’s because after over an hour of exposure, light “pollution” from surrounding light sources, city lights, etc. find their way into the camera. In fact, with longer and longer exposures, the Initial stacked picture can sometimes end up looking more grey with lots of white spots than anything resembling color.
- You’ll notice a dark spot or smudge in between the two objects. Unfortunately, that is a spot of moisture or dust that has found its way to the camera sensor. It is probably very, very tiny, but shows up. It’s extremely annoying, but it happens because of how the camera is usually lying somewhat on its back as it is taking images from the telescope and the sensor is wide open to a much bigger space from within the tube of the telescope which is acting like the lens of the camera. Junk inevitably gets in! This is also something that we can use Photoshop or Gimp to process out.
- You’ll also notice, if you look closely, how the stars are, for the most part, rounder at the centre of the picture and a tad more oblong at the edges. Again, this is inevitable because of the nature of a camera or telescope lens which tends to have some distortion closer to the edges. This is why we try to get the objects we want to photograph closer to the centre.
- Color: Ok, here is it. When you look at this picture, you can see how someone might think “color” has been added. Compare this picture to the one on the top and you can see how much more color the first one has. Or does it?
The reality is, the millions of bits of information that are stored in each photo as packets of light photons hit the camera sensors do in fact have “color” embedded in them. (If you are a physicist or know something about how light works, you know I’ve oversimplified this.) However, the main point is that the sensor does pick up “color information” even if to our eye it is very difficult to perceive. (By the way, I’m not even getting into the science of how our eyes detect color information. We have things called “cones and rods” in our eyes that are responsible for detecting light and darkness on the one hand and color information on the other. In darkness, our eye is working harder to process light rather than color so our rods take over. In daylight, the color processing takes priority and the cones kick in. But that’s all for another post!)
Here a little bit of explanation of how digitized color works. In computer and camera systems, the basic way that color is produced is through combining varying levels of Red, Green, and Blue (RGB). In most digital cameras, you can view a “histogram” that tells you what combination of each of Red, Green and Blue appears in a photo. In most systems, these levels are usually designated between 1 and 256. So, if you had a level of 256 of Red, 1 of Green, and 1 of Blue, you would see primarily a very brilliant Red.
The point is, that the camera sensor will in fact pick up Red, Green, and Blue packets of color information (corresponding to their frequency) in varying proportions, whether or not your eye can see it. This is important to understand because if you were at my telescope eyepiece when I was lining up M66 and M65 above, your eyes, unless you had brilliant vision and had been dark adapted for several hours (it takes time for our eyes to adjust to seeing well at the telescope–we need to be careful about saving our “night vision” if we are doing optical viewing), wouldn’t likely be able to detect much color at the eyepiece. With good seeing conditions and a decent scope, you might make out the shape, and with certain objects–like stars which tend to have one dominant color–you might see reds, yellows, whites, and occasional blues.
So, just because you couldn’t easily detect those colors with your naked eye at the telescope’s eyepiece (especially since it is dark and your cones aren’t functioning as well as your rods), it doesn’t mean the color isn’t there! It just means your eye isn’t as sensitive as the sensor of a camera.
Why is that the case? It is all about aperture and storage.
In camera language, aperture is simply the opening inside a lens that allows light through to hit the camera sensor. The larger the opening, the more light can get in. Lenses with large apertures are sometimes called “fast” lenses, which means that they can gather more light more quickly. The analogy to the human eye, of course, is your pupil. When you are in bright light, your pupil contracts to block out light, and when you are in the dark, your pupil dilates or expands to let in more light more quickly.
So technically, a camera will simply outperform an eye because of how wide an opening it can have compared to the human eye. Just think about how small your pupil opening is compared to how wide the opening of a camera aperture is and it makes sense that camera will beat us every time, at least as far as light/color collecting goes!
But then there is also “storage.” While the human eye is seeing “live”, the camera is taking the light information in and storing each millisecond’s information into memory. While our eyes seeing constantly updated light and color information, it is more like seeing one frame at a time. A digital camera, however, is taking that information and piling it up into memory, as it were. When you see a picture on your screen after you’ve taken a picture in your phone or camera, it is the cumulative information of however long the exposure was. Here again the human eye simply cannot compete with camera technology. We can take practically take very long exposures and collect millions and billions of bits of data from one object‘s constantly streaming light coming to us. The eye can only see it “as it happens.”
So back to color: The image above is actually greyish/white because it has SO MUCH information that it needs to be digitally “toned down” as it were. The information is all there, but there is so much that it tends toward the white end of the spectrum, which theoretically, is the sum total of all colors. (Remember from elementary school science class where a spectrum is used to break down white light into the colors of the rainbow?) So in reality, we aren’t so much “adding” color to an image, as we are seeking to break out the the piled up color information into the visible spectrum that our eyes and brains see as color.
When the information from over an hour of exposure for the photo above is put into a piece of image editing software, we can do many things to it. But the basics are:
- We can reduce the brightness so that the dark background becomes more prominent. Essentially, we are filtering out excess light in this step.
- We can increase the contrast which makes the light parts lighters and the dark parts darker.
- We can increase or decrease (or stretch, as they called it in Astrophotography) the RGB levels. That is, we can separate out the Red, Green, and Blue channels of information from a photo and increase, for example, the blues, while decreasing the reds or greens. That does end up “changing” the color. But we aren’t “adding” color as much as we are changing the balance or dominances of one color over another. Or we can boost or decrease all three channels at once which doesn’t change the color as much as it simply makes it more brilliant and easier for our eye to see.
Of course, with digital processing software such as Photoshop or GIMP, we can do all kinds of color trickery. I’m sure that happens sometimes when an Astrophotographers intentionally alters color levels significantly from the object’s natural state. But from what I can tell, most astrophotographers, like any photographer, are usually seeking to maintain the natural color data as much as possible unless they are intentionally seeking to do something artistically unique. There is, of course, some subjectivity in making decisions during the post-processing stages that will result in some differences between photographers and there are clearly instances of artistic expression. But for the most part, I, at least, am trying to maintain “natural” color as much as possible!
